The Development/Deployment Workflow
Multiple Stages In The Development Workflow
You can think of the process of developing and deploying an Orleans application as a journey, as indicated by the following diagram.
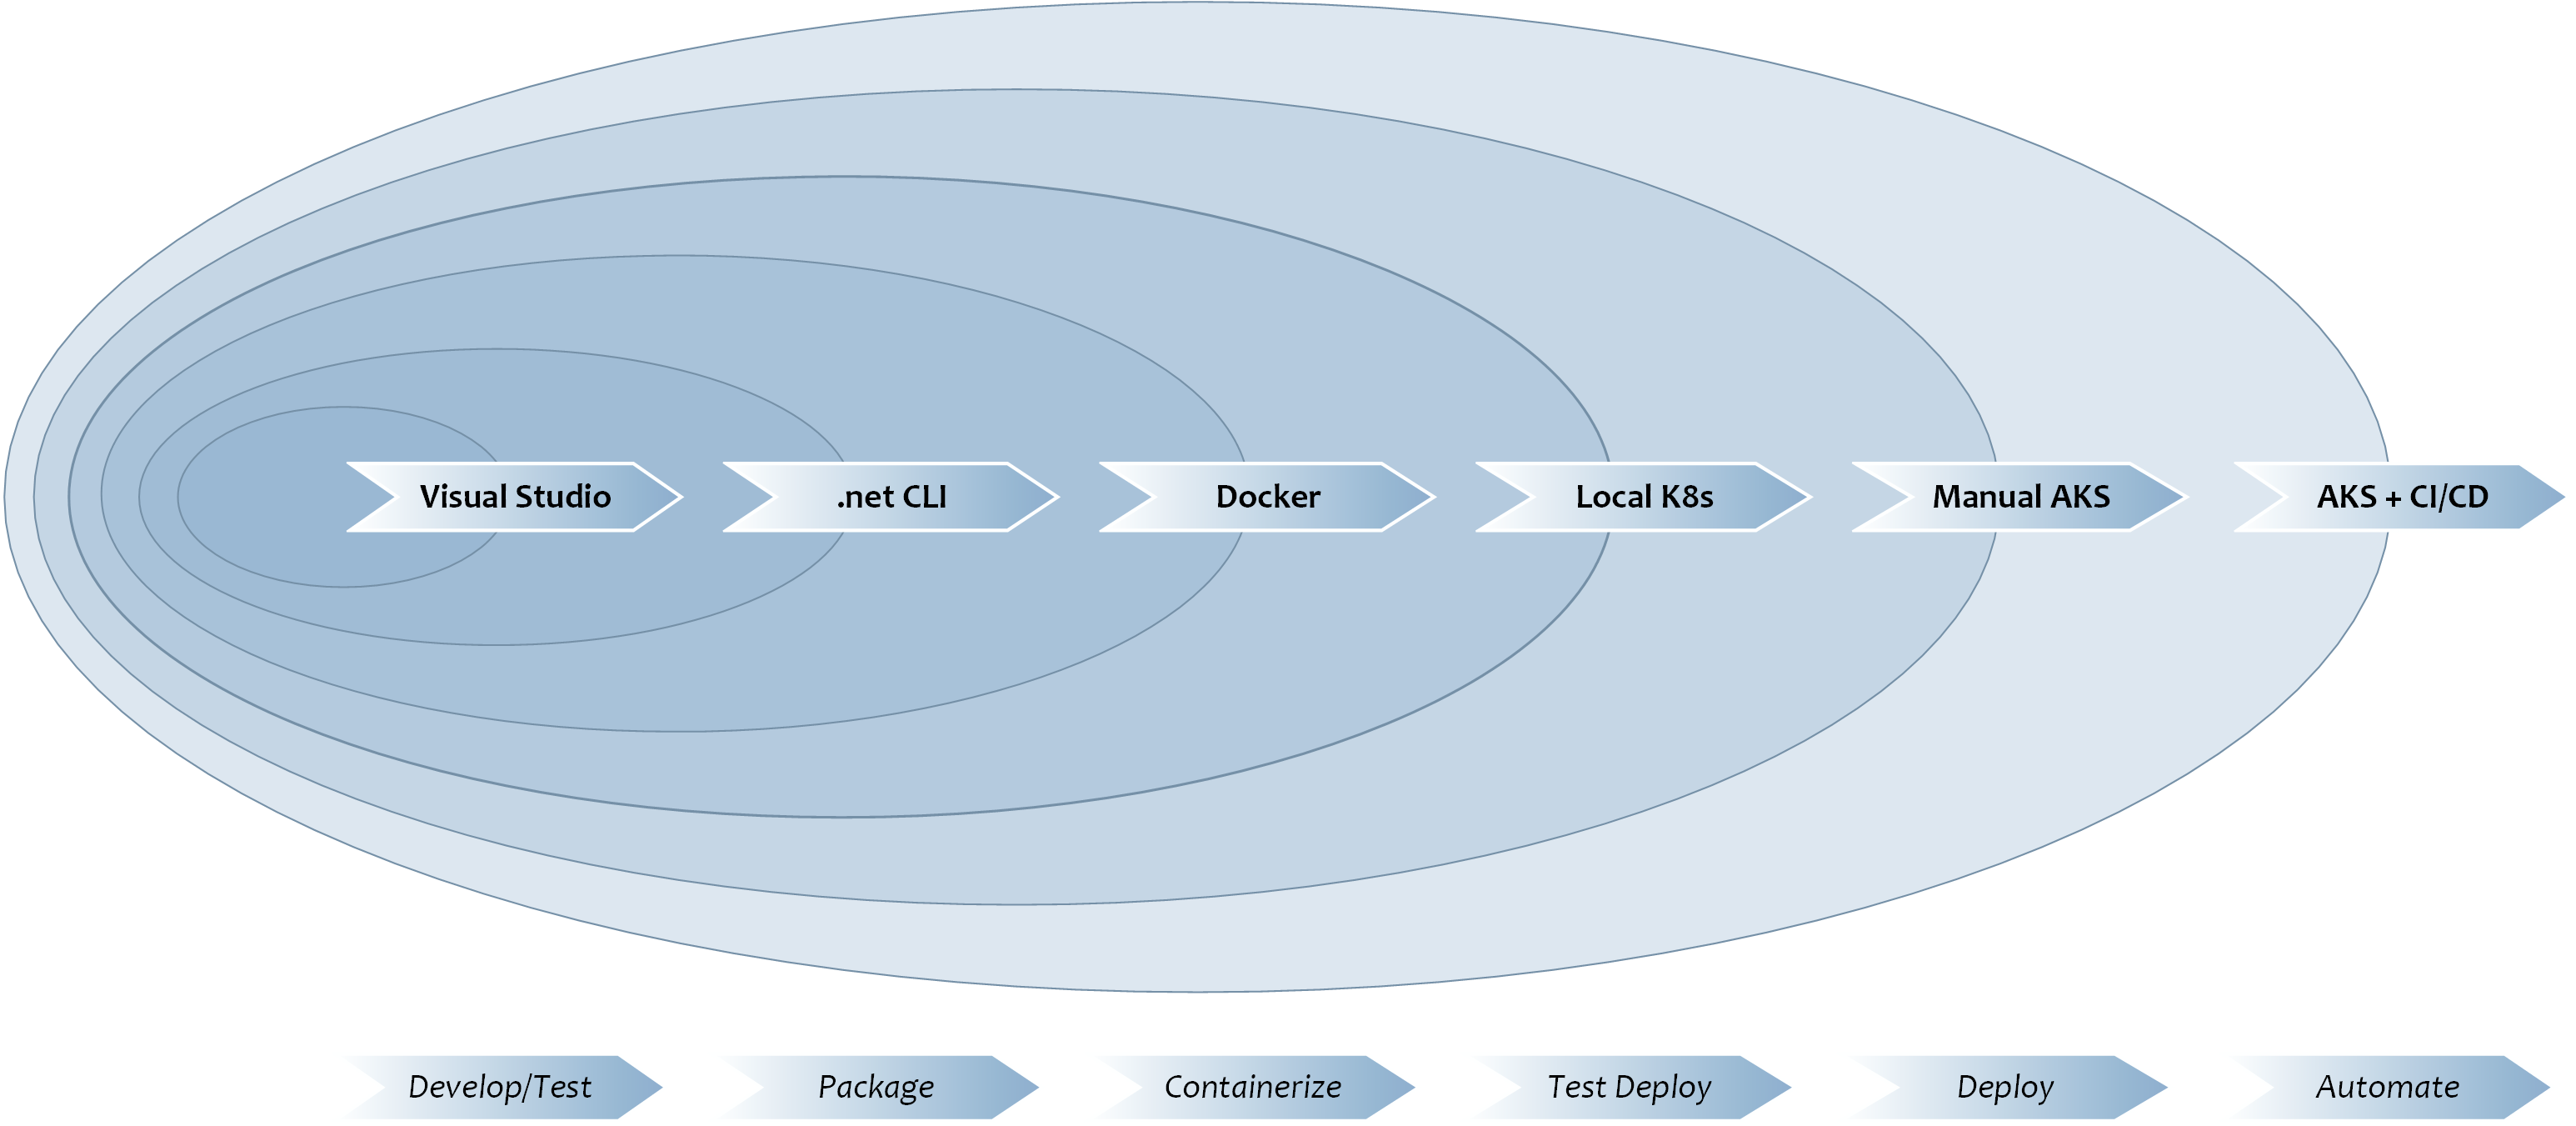
As seen above, you might expect to go through the following stages whilst building an application:
0. Initialization
As soon as you create a project from the template, run make init in the project folder. This will create a git repository in your project folder and make the initial commit.
Follow git practices to create branches and commit code. You can use appropriate git remote commands to link your repository with something hosted on GitHub. We’ll be primarily developing scripts for CI/CD on GitHub.
1. Application Development/Testing
We are assuming that most of your code will be developed with Visual Studio (or Visual Studio Code).
Here you will add grain definitions corresponding to the domain of your problem, the appropriate business logic, and the associated tests to validate that your grains are processing their messages correctly.
You can find further details about how to develop an Orleans application in the sections on Grain Development, Grain Testing and Debugging.
In this stage, you can expect to take advantage of all the tooling available to general .NET applications such as debugging with breakpoints, inspection of variables and so on.
The purpose of this framework is to allow you to focus most of your time here, as this is the unique part of your application. The rest of the boilerplate and automatable processes can come from the framework.
Once you are comfortable with the functionality of your application, you will begin the next stage.
2. Standalone Mode and Packaging
The second stage will be to validate that the application will run in ‘standalone’ mode with the dotnet CLI.
In this stage, you will primarily use the git bash shell and use make to run commands.
The primary purpose of ensuring that your application can run with the dotnet CLI is to ensure that you can run in a server environment, where Visual Studio will not exist. This is achieved by ensuring that the artefacts produced by dotnet publish are sufficient to successfully run the application.
Most of the time you will spend here is ensuring that dependencies and configurations are set up in a portable way, and that the excellent support Visual Studio gave you whilst developing and debugging the application does not turn into a hidden dependency for your server version.
- Clean the project with
make dotnet-clean. This removes build artefacts and restores - Restore, Build and Test the project with
make dotnet-test. - Publish the project to an output folder with
make dotnet-publish. - Run the artefacts in the output folder with
make dotnet-run.
make dotnet-allis an alias target which doesdotnet-clean dotnet-test dotnet-publish dotnet-run. This will implicitly rebuild, test, republish and run the project as you make changes in your code and re-run it.
Once the application can run from the dotnet CLI, we are able to package and deploy single instances of the application into Azure (or indeed AWS) in a variety of configurations. On Azure, there are several references on how to deploy an App Service, for example, or set up a VMSS with your application so you can scale to a cluster with multiple silos.
However, because this is an opinionated framework, the next stage in the journey will involve containerization.
3. Containerization
The third stage will be to containerize the application so we can use Docker.
This framework has the strongly held opinion that building and running your application from within Docker has the effect of exorcising it from a host of gremlins that pop up during running in production.
We hold that Docker has at least the following benefits:
- Building the application inside of a Dockerfile strictly constrains the build environment, eliminating the effects of environmental dependencies and tool version combinations.
- Building a dotnet application inside of a Dockerfile makes it truly cross-platform. This means that even though we run Docker on a Windows machine to build the image, we can build an image that will run correctly on Docker running on Linux in production.
- Repeatability. You are sure that the same docker container deployed a second time months later than the first will result in the exact same runtime image. This means that roll-back becomes much easier.
The template includes a built-in Dockerfile script to build and package the application.
-
Build the
dockerimage withmake docker-build. This will start with a pristine development environment, build & test the project, publish the build artifacts, and copy them onto a pristine runtime environment. Intermediate build artefacts and tools are therefore not present in the runtime image.For the
silo-and-clienttemplate type, these targets will build both the silo and client images. -
Run the image locally with
make docker-run. The defaultDockerfileis set to run a single-silo cluster withHostLocalclustering. If you want to run withAzureclustering mode against your local Azure Storage Emulator, you can usemake docker-run-local-ase.For the
silo-and-clienttemplate type, these targets will run both the silo and client images. You may need to tweak the arguments passed to the client image to properly identify and communicate with the silo by modifying thesilo_addressargument in the client’sMakefile. -
Stop all running containers - not just your Orleans Universal Silo ones - by using
make docker-stop. -
List the docker images you have built with
make docker-list. You will note that the tag of the image is based on your git branch and git commit hash. Ensure that you commit your changes before building a docker image to be able to tell, at a glance, what code is present in which docker image.
4. Test Multi-Instance Deployment
Whilst the prior stages of our journey allowed us to run single-instances of our application, this stage in our journey kicks it up a notch and runs a multi-instance cluster within the local Kubernetes platform enabled with your Docker Deskop version.
For a lot of developers who are not familiar with Kubernetes, this stage is the first step into a steeper learning path. So don’t feel discouraged if you do not get things to click immediately. I spent a lot of time reading and trying things out while developing applications at this stage.
I am assuming you have built your development environment as I’ve suggested, so the following instructions are geared specifically for such a setup. If your environment is different, try analogous steps or reach out for help on twitter/github!
-
Get familiar with the idea of Kubernetes (k8s) contexts as you proceed. You will be using the same
make k8s-xxxtargets against both your local k8s environment (in this stage) and the remote AKS environment (in the next stage).On Windows, you can visually inspect which context you are operating against by clicking on the “Docker whale” in the tray, and looking for the context in the “Kubernetes” menu item.
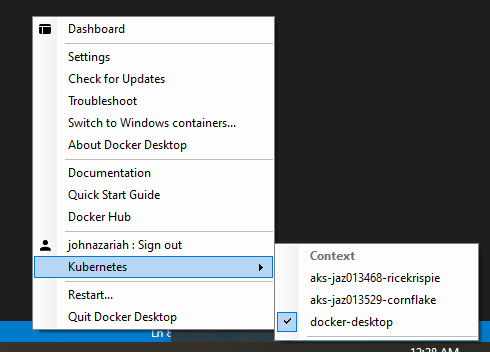
For this stage, ensure that you have selected the
docker-desktopcontext. -
Deploy the most current image (based on the git branch name and git commit hash) to the k8s context by running
make k8s-deploy. This will create a namespace (by default named ‘green’), and deploy k8sservices andpods into it.The development cycle you will likely follow at this stage is:
- make some changes to your code
make dotnet-allto build, test and run your project until satisfactory.- commit (to update the hash of the HEAD commit)
make docker-buildto build adockerimage with these changes.make k8s-deployormake k8s-upgradeto deploy 3 copies of the latest image into the currentk8scontext.
-
You can delete an existing namespace in the current k8s context with
make k8s-cleanup. This will blow away all your pods.You may not need to do this the first time, but it’s recommended that you do this after making many changes so you can verify your application running in a clean-slate environment. After running
make k8s-cleanup, you will need to runmake k8s-deployas this will create a new namespace.Kubernetes sometimes takes time to delete a namespace, so ensure you wait appropriately before re-creating a new namespace with the same name as one you just deleted.
-
You can keep the namespace and existing k8s
services, and simply upgrade thepods with the latest image withmake k8s-upgrade. -
You can use
make k8s-statusas an alias forkubectl get allto inspect all the components running in the current context.Digression : Docker Compose We can get also get multiple instances - for testing purposes - of our docker image running and cooperating with **Docker Compose**. There is no default `make` target for running `docker compose`, but you can write one, or just do `docker compose up` to get 3 instances pop up. This is useful to try if the local k8s cluster doesn't work, and you want to make sure it's not something to with your image!
5. Manual Deployment to AKS
For a lot of developers who are not familiar with Azure, this stage can feel daunting so don’t feel discouraged if you do not get things to click immediately. I spent a lot of time reading and trying things out while developing applications at this stage.
I am assuming you have built your development environment as I’ve suggested, so the following instructions are geared specifically for such a setup. If your environment is different, try analogous steps or reach out for help on twitter/github!
I am also assuming you have at least one Azure subscription set up properly. Sign up for a free Azure subscription if you do not.
For this stage, it’s best to create two terminals running git bash and set the working directory of both of them to the project folder.
For purposes of clarity, we’ll call one of them the “Azure” shell, and the other the “Project” shell:
- In the “Azure” shell:
-
Run
make az-startto fire up an interactive shell inside the official Azure CLI Docker image, mounting the project directory and making it current.This will allow us to run
az ...commands without installing theAZ CLI, as well as targets from theMakefile. -
Run
make az-login. This will allow you to use your browser to authenticate against Azure. When this succeeds, it will print out all the subscriptions you have access to. Find theidproperty of the one you want to use. -
Run
make az-sub-set sub=<id you selected above>. This will set the shell to use the selected subscription by default, and all further operations will affect that subscription.make az-sub-showwill show the active subscription details. -
First-Time Operations:
This would be a good time to edit
Setup.cfgand provide values in it for your subscription, your organization name, the project name, and the region you want to use. The organization name has to result in a globally unique Azure Container Registry name, and should only contain lower-case alphanumerics. A good organization name is a representative prefix of a few characters followed by a random number of 5 or 6 digits.If you have created and deployed a project before, put the same organization name as before into
Setup.cfg.If you have created and deployed a project before, ensure that the project name in
Setup.cfgis new and unique.Remember that the
Setup.cfgfile contains secrets, so we DO NOT include it in source control.-
make az-new-orgshould only be run once per organization name.It sets up a resource group and an Azure Container Registry that can be shared against many projects.
Additional project-shareable resources like an Analytics Workspace are also set up here.
-
make az-new-projshould only be run once per project. It sets up a resource group, an AKS cluster, and a storage account for use only by this project.When this target is run, the script will emit two values:
- A storage connection string. Put this value carefully as the value of
paks_storage_connection_stringinSetup.cfg. - A token to be used to login to the Azure Container Registery. Put this value carefully as the value of
oaks_acr_login_tokeninSetup.cfg. This is a long string with no line breaks.
- A storage connection string. Put this value carefully as the value of
-
-
-
In the “Project” shell:
- Run
make aks-prepareto set up the k8s context to the remote AKS cluster. It will:docker logininto the ACR using the login token embedded inSetup.cfgso that deployments can pull the images from the ACR.- switch the context on your local kubernetes environment to point to the newly created AKS cluster
- create a namespace on the AKS cluster
- set up the storage connection string as a
kubectl secretso that deployments can properly configure the silos to use Azure Storage for Clustering and Persistence
-
Run
make docker-pushto push the latest built image to the remote Azure Container Registry. - Run
make k8s-deployto deploy the remote AKS cluster, where it will pull the image from the Azure Container Registry specified, and use the secret setup to interact with Azure Storage.
- Run
6. CI/CD and more
Stay tuned for this.